Cacao nibs cookies can be a great way to get in the groove and hop on the cacao nibs train. I love original raw cacao nibs and orginal raw cacao powder.
A cool way to consume these wonderful gifts of nature is to come up with a recipe that will make the cacao, the heart of the final product. Hence, the birth of these cacao nibs cookies.
I set myself this challenge and I’d like to think I succeeded with this cacao nibs cookies recipe. You should try it out and see for yourself what I am talking about.
These cookies are tasty, healthy and balanced in terms of macro-nutrients. The cookies have got carbs, proteins and healthy fats. All the good stuff plus micronutrients.
And they store well too…for days.
So, what do we need to make these cacao nibs cookies?
Whole oats X 2 – 3 cups
Wholemeal Rye flour X 2 cups
Peanuts X 5 handfuls
Baking powder X 2 tbs and half
Cacao nibs X 3 handfuls
Cinnamon powder X 4 tbs
Bananas X 10 fingers
Vanilla Extract X 3 tbs
Coconut oil X 3 tbs
How to make the Cacao Nibs Cookies
Start off with the wet ingredients.
>> Peel your bananas and place in a bowl
>> Add Vanilla extract and coconut oil into the bowl with the bananas. Now mash up all 3 ingredients to create a banana paste. You may use a food mixer instead of doing the mashing up of the wet ingredients manually.
Set aside.
>> Now put all the dry ingredients into another bowl – the whole oats, Rye flour, Peanuts (you can use any other type of nuts), Cacao nibs, Baking powder and Cinnamon. Mix together.
>> Add the mixed dry ingredients into the bowl with the wet ingredients.
>> Now mix all together to form a thicker brown paste. How brown the paste and the eventual cookies become depends on the amount of cinnamon added.
>> So, do not worry if the cookies are paler than mine. It’s the cinnamon. I like to add cinnamon because cinnamon will slow down the release of glucose from the cookies upon digestion. That prevents blood sugar spikes.
>> Having made the thick brown paste, it’s time to make the cookies into moulds. You can go crazy with creativity here. Mold them into any shape you like.
>> Place cacao nibs cookie moulds on a lined baking tray. If you are not using a Parchment paper like me, line the baking tray with aluminium foil and spray the foil with oil spray to stop the cacao nibs cookies sticking on to the aluminium foil.
>> It’s time to bake the cacao nibs cookies. Bake them at 180 – 200 degrees for about 15 – 20 minutes.
>> But please check on the cookies intermittently to ensure they don’t turn out to be too dry. You want the banana moisture to be retained. So, you want to check on the cookies so, they are crispy on the outside and gooey on the inside. Yummy!
Get the cacao nibs cookies out when you are happy with them and serve with a cup of tea, coffee. Use as snack or as a meal. The possibilities are endless. Enjoy!
Why the 5-minute hummus? One of the things I like to do and I encourage people to do is simplify what they eat. Simplicity has always been in the forefront of what I do and preach.
If you follow this blog, you will attest to that.
And I am not about to change that. Not today. Not tomorrow. Not forever.
Hence, in an effort to continue with that principle, I set myself a challenge. I believe in legumes…a lot.
Legumes are great for your health. We just don’t eat them enough. And I want to change that. Get people to eat more legumes.
One way to up your intake of legumes is to eat hummus. Much of the hummus we eat is made from Chickpeas. Why not eat more of the stuff – chickpeas.
So, I set myself a challenge. To simplify the hummus we make. I have come up with a hummus recipe construction that is so easy, anyone (absolutely anyone) can throw this quick easy homemade hummus recipe together without fuss.
This oil-free quick hummus only requires 4 ingredients plus salt. How cool is that?
If you are vegan, you can eat this 5-minute hummus. If you are a vegetarian, you can have it as well. If you are a calorie counter, you can make this easy hummus recipe, because it is a low-calorie hummus.
Okay, let’s get started.
What do we need to make this 5-minute hummus easy recipe?
Lemons X 2
Red Onion X 1
Tahini paste X 4 scoops
Chickpeas in water (drained) X 3 cans
Salt to taste
How to make the 5-minute hummus
>> Slice your red onion and chuck them into the food processor.
>> Squeeze out your lemons to get your fresh lemon juice (not shop-bought lemon juice). Pour the lemon juice into the food processor.
>> Drain your chickpeas. Always use chickpeas in water for your hummus. Avoid the chickpeas in salt water (brine). You don’t need that. Anyway, drain your chickpeas and add the drained chickpeas into the food processor.
>> Add 4 scoops of Tahini paste into the contents of the food processor. For those who have problems sourcing Tahini paste, use Peanut butter instead. Peanut butter will give you similar results. I will advise you use peanut butter without added sugar though. No added sugar please. It might be sweeter but remember, refined sugar is bad for our health.
>> Add salt to taste.
>> Then blitz the content to a fine pulp. Shouldn’t take more than 3 minutes to blitz.
>> Pause the food processor. You might find that it’s not blitzing the content finely enough. That’s because the hummus being made is too thick. Add some water to thin it out a little as you saw me do in that video above.
>> After adding water, blitz some more. The texture of the 5-minute hummus will change for the better and indeed your food processor will thank you for it because it’s less work for it to do. By adding some water, you have made the blitzing job easier for the food processor.
>> Pause after about a minute or so. And your 5-minute easy hummus is now ready. Yippee!
Now taste the beauty. Hmmm, awesome taste.
Even though the hummus took you less time than it takes to open a pack of shop-bought hummus, this one tastes better and more importantly, you know what’s gone into it. No guessing.
And it’s healthier!
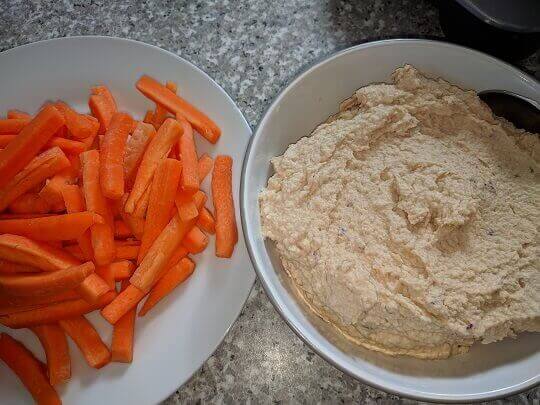
Healtheir in the sense that my blood sugar was 5.2 mmol/l (93.6 mg/dl) 1 hour after eating the 5-minute hummus with carrots. How cool is that?
There is always this widespread impression that a hummus has to have vegetable oil slapped all over it for the hummus to be complete. I say, No, it doesn’t.
I have seen videos of hummus preparations where the hummus is practically dripping with virgin oilve oil. Yes, olive oil might be healthy but do you have to soak your hummus in it for you to enjoy it?
I don’t count calories in my eating plan but calories do matter to a certain extent. After all, they constitute your overall energy intake. Draping your hummus with so much oilve oil will just add to the overall calorie content without necessarily adding immensely to the eating experience.
Here I present to you an oil-free hummus recipe that you can enjoy without any undue calorie concerns.
This oil-free hummus recipe uses the 4-4-2 formula.
4 ingredients at the base of the food processor, 4 ingredients in the middle and another 2 ingredients at the top before the final blitz to get the end product – a sumptious oil-free hummus. This oil-free hummus is suitable for vegans, I should add.
So, what do we need for this oil-free hummus recipe?
Lemons X 2
Sweet Peppers X 2
Garlic X 3 cloves
Red Onion X 1
Cumin powder X 3 tbs
Coriander powder X 3 tbs
Paprika X 3 tbs
Tahini Paste X 4 tbs
Chickpeas X 2 cans
Salt to taste
How to make the oil-free hummus
==> Slice up your red onion, garlic, and bell peppers and chuck them into the food processor.
==> Squeeze out the juice from the 2 lemons and pour into the food processor. Blitz the content for about 2 minutes. This is the base.
==> Add the Tahini paste, the cumin powder, the coriander powder and paprika and blitz for about 1 minute.
==> Now drain the chickpeas and add them to the food processor. Always make sure, you get the chickpeas in water NOT in brine. Add salt on top and blitz the content until you are happy with the texture.
If you like your oil-free hummus very smooth, blitz for longer. You can always pause the food processor every now and again to check if you are happy with the texture.
That’s it. Your oil-free hummus is ready for your enjoyment.
Garnish with chives and some nuts like peanuts or cashew nuts.
Does this oil-free hummus hit the mark as far as blood sugar is concerned? You bet, it does. I got a reading of 5.0mmol/l (90mg/dl) 1 hour after eating it with some carrots.
A flavoured beetroot hummus recipe? Oh, Yes, it is.
When it is dark outside especially in the winter months, you need something to lift you up.
Your mood may not be down in the boots like the weather, but it’s not always a bad idea to munch on something uplifting, regardless.
Not just that, a flavoured beetroot hummus is something that brightens the evening. Get that purple colour out in a bowl and voilla, the room begins to sparkle.
Don’t be surprised. It’s not just colour but the flavoured beetroot hummus recipe does actually tickle the taste buds too.
So, what do we need for this flavoured beetroot hummus recipe?
Red Onion X 1
Garlic X 4 cloves
Bell peppers (Sweet peppers) X 2
Steamed Beetroot X 350 gm
Lemon X 2
Canned Chickpeas X 3 Cans (drained)
Tahini paste X 3 scoops
Cumin X 3 tbs
Coriander X 3 tbs
Paprika X 3 tbs
Black pepper (ground) X 2 tbs
Salt
How To Make the Flavoured Beetroot Hummus
>> Slice up your red onions, garlic and sweet peppers.
>> Slice up the beetroots into smaller chunks.
>> Cut up your lemons and squeeze out the lemon juice.
>> Pour the lemon juice into your food processor and chuck in the sliced red onions, garlic and sweet peppers. And blitz them up in the food processor until fine in texture.
>> Add the sliced up steamed beetroot and blitz as well.
>> Now add the seasoning agents – Paprika, Ground black pepper, Coriander and Cumin along with the Tahini sauce.
Don’t blitz yet.
>> Add the drained chickpeas. If you are struggling to fit all the chick peas in, you can use 2 and a half can of chickpeas.
>> Now top it up with salt and blitz the entire content. Stop every now and again to check the texture. Usually it turns out just about right. But for those who like their hummus thinner, you may add a little water at a time and blitz until you are happy with it.
I like mine fairly thick. Blitz until you are happy with it.
>> Turn off food processor and serve. Garnish with chopped chives and or finely chopped carrots.
Now enjoy your flavoured beetroot hummus.
Does this flavoured beetroot hummus recipe meet my strict blood sugar test? You bet, it does. I got a blood sugar reading of 95 mg/dl (5.3 mmol/l) when I had mine with carrots. Yummy!
Banana hummus? What’s that? That’s the kind of response I get when I tell people about this recipe. A banana hummus is hard to imagine, I know but it is alive and kicking, folks. Banana hummus is.
And you are going to love the banana hummus because it is simply lovely to taste.
I don’t want to talk about the benefits of banana here but suffice it to say, bananas are good for you.
In fact, bananas are not good for you, they are great for you.
Love them everyday, please. If you are looking for magnesium for instance, just eat bananas. Ditch the supplements.
I don’t know if I am blazing a trail here regarding this banana hummus recipe. It’s possible someone somewhere has done something similar. I don’t know. I haven’t searched online if anyone else has come up with an easy banana hummus recipe yet.
Maybe there’s another crazy person out there that has so much time on their hands like I do, to come up with this. In any case, I have and my creation is here for you to enjoy, if you so wish. And why won’t you.
So, what do we need for this easy banana hummus recipe?
Bananas X 3
Chickpeas (canned) X 3 cans (drained)
Red Onions X 1
Garlic X 4 cloves
Sweet Peppers (Bell peppers) X 2
Lemon X 2
Paprika X 3 tbs
Coriander powder X 3 tbs
Ginger powder X 3 tbs
Cumin X 3 tbs
Black pepper (ground) X 3 tbs
Tahini paste X 4 scoops
Salt
How To Make The Easy Banana Hummus
>> Chop up your red onion, garlic and sweet peppers (bell peppers) into smaller chunks. Peel and slice up your bananas too.
>> Squeeze out your lemons and pour the lemon juice into your food processor.
>> Put in the chopped up red onions, bell peppers, sliced bananas and garlic into the food processor with the lemon juice and blitz the content to a fine paste.
**Now I use a ratio of 1 canned chickpeas to 1 banana. You can use 2 cans of chickpeas instead of 3. In that case use 2 bananas too. I say this because depending on the size of your food processor, you might struggle to fit in 3 bananas and 3 cans of drained chickpeas.
>> I like to add the seasoning agents in the middle layer before adding the drained chickpeas.
>> So, add the paprika, the ground black pepper, coriander spice, ginger powder, cumin and the Tahini paste.
>> Now top up the content in the food processor with the DRAINED chickpeas, add salt and blitz the entire content to a fine paste.
>> Like I always say, I like my hummus thick. You may not. If you are someone who likes yours thinner, you can add small amounts of water at a time and re-blitz the content until you are happy with the texture.
>> Turn off food processor and serve, garnishing with chopped chives and chopped carrots.
Does the easy banana hummus pass my blood sugar test? It sure does. I had my easy banana hummus with carrots and I got a blood sugar of 102 mg/dl (5.7 mmol/l). I like that!
It’s 7pm where you live. It is summer, you peek out the window, and it’s still sunny out there. Lovely!
In the spirit of the summer evening you feel a dinner of white rice is a good fit for this awesome weather. However, you keep reading that white rice is too processed and not very good for your metabolic health.
You hear that brown rice is better but you hate brown rice. Okay, ‘hate’ is a strong word. The word you are looking for is ‘dislike’. You want to stick with your preference – white rice.
So how can you eat your white rice without hurting your metabolic tranquility?
Enter the veggie rice with kale sauce.
Have your rice and eat it. No qualms with veggie rice with kale sauce.
Having vegetables with your white rice is a clever way to retain your white rice preference. Kale is a great leafy green vegetable to complement your white rice.
What do you need to make the veggie rice with kale sauce?
Ingredients:
White rice X 1 cup
Red Onion X 1
Kale X 200 gm
Tomato puree X 2 tubes
Garlic X 2 cloves
Bell pepper X 2
Celery X 2 sticks
Curry powder X 3 tbs
Coriander powder X 2 tbs
Thyme X 2 tbs
Cinnamon X 3 tbs
Chilli pepper X 1
Canned tuna x 1 can
Cooking oil X 5 tbs
Salt to taste
Red wine vinegar (optional)
How to make the veggie rice with Kale sauce
>> Slice up your red onion, bell pepper (sweet pepper), garlic, celery, kale vegetables and chilli pepper.
>> Cook your white rice as usual and set aside.
>> In a wok or skillet, pour in the cooking oil and heat it up.
>> Add the red onions and garlic and stir fry until onions are tender.
>> Turn down the heat and Squeeze the tomato purees into the red onion/garlic mixture. Stir together.
>> The tomato puree is a thick paste, so it requires fluid to solubilise it. Add red wine vinegar (optional) and some water. If you are not using red wine vinegar, use water all the way. Add water a little at a time, stirring the paste to see it bubbling as it cooks. You may keep adding water if the tomato puree appears to be drying up and not bubbling to the surface. Let cook for about 5 minutes.
>> Now add the celery, chilli pepper and bell peppers. Stir together. Let cook for 3 minutes.
>> Add the seasoning agents – curry powder, thyme, cinnamon, coriander powder, salt and the canned tuna. Stir together.
You may use any other fish instead of tuna – smoked salmon, smoked mackerel or even tofu if you want the pure vegan option. You don’t have to use tuna.
>> Allow to cook for about 4 minutes.
>> Now add the kale vegetables and stir together. Allow to cook for a further 4 minutes. Turn off heat.
That’s it. Your veggie rice with kale sauce is ready.
Now serve with your cooked white rice and enjoy.
How about the veggie rice with kale sauce blood sugar integrity? I got a blood glucose reading of 6.5 mmol/l (117 mg/dl). Told you, you could have your white rice and eat it.
The contents of the site are for informational, educational and entertainment purposes only. The content is not intended to be a substitute for professional medical advice, diagnosis, or treatment. Always seek the advice of your physician or other qualified health provider with any questions you may have regarding a medical condition. Never disregard professional medical advice or delay in seeking it because of something you have read on this website!


![Easy Banana Hummus Recipe [That Works]](https://i0.wp.com/thedrjoe.com/wp-content/uploads/2018/01/Banana-hummus.jpg?resize=448%2C536&ssl=1)


Dr. Joe