
Food
 By Dr Joe
The chicken cacciatore is one dish I prepare every once in a blue moon. I hadn’t prepared it for about 5 months or so and it needed a comeback. It’s always worth it.
Anyway, the kids back from University and lazing around the house gave me a little nudge the other day.
Dad…Yep, I answered.
“You haven’t prepared the chicken cacciatore for a good number of months now. Don’t you think the time is right and ripe for it?” asked my eldest son.
I thought…Yeah, why not. I will try and do it up for you kids and at the same time share the recipe on the blog for the greater good. I answered.
So off I went from my busy schedule and that’s how the chicken cacciatore recipe you see here now got here.
It’s a lovely dish and you can do whatever you like with it. It’s got a wide range of application. The chicken cacciatore is just a rich sauce designed with only one thing in mind.
> To blow your socks off. I love it. My children love it. My wife loves it. Hopefully you too will love it.
I love the chicken cacciatore so much I don’t prepare it often to maintain that fondness I have for it. Wierd, I know.
So, what do we need to get the chicken cacciatore to the dining table?
Before I list the ingredients, I should mention that the quantity of ingredients you see below serves 5. Yep, you guessed it. It’s a big pot. Why go small when you can go large.
Ingredients:
Rapeseed oil X 10 tbs
Red Onions X 2
Garlic X 4 cloves (crushed)
Mushrooms X 600 g
Celery X 3 sticks
Sweet peppers (Bell peppers) X 2
Red Wine
Tomato Passata X 1000 g (2 Cans)
Tomato Puree X 280 g (2 tubes)
Chicken X 5 servings
Roast peppers X 285 g
Olives X 340 g
Thyme
White pepper
Vegetable stock X 3 cubes
Salt


Don’t be scared!
Yes, it does look like a laundry list of ingredients but this chicken cacciatore recipe is not as daunting as it looks on face value. It’s very easy. We want flavours and that’s what you are going to get. And you are going to love it once you put together what is essentially a multi-purpose tomato-based super sauce.
One more thing: I prefer to boil my chicken before starting the preparation. I like my chicken meat to fall off the bone. If that’s not your thing, then you can add the chicken directly to cook in the richness of the cacciatore. Your choice.

How To Make The Chicken Cacciatore
>> Slice up your mushrooms, red onions, celery, sweet peppers (bell peppers) and crush your garlic.
>> Into a large cooking pot, pour the rapeseed oil and heat it up gently.
>> Add the sliced red onions and crushed garlic to the oil. Stir intermittently until tender.
>> Add the mushrooms, sweet peppers (bell peppers) and celery. Stir and allow to cook for 3 minutes, stirring every now and again.
>> Now pour in the red wine. I use about 180 ml of the wine. Obviously you may add as much wine as you are comfortable with but bear in mind, you will be needing more tomato passata and tomato puree, the more wine you add. Allow to cook for 3 minutes.
>> Add the tomato passata and the tomato puree and stir together very well. Allow to cook for 5 minutes. I use that much tomato passata and tomato puree because I want the finished product to be quite thick in consistency. Judge for yourself if you need more tomato. If you do, add more puree as it has a better thickening effect.
>> Now add the previously boiled chicken. Stir. If you want to lighten the cacciatore because you feel it is too thick (I like it thick), you may use the broth from the cooked chicken for that purpose, otherwise leave well alone. Let cook for 5 minutes. If you are using raw chicken, you need to cook a little longer.
>> Add the roast peppers, olives and the seasoning agents – vegetable stock, thyme, white pepper and salt to taste. Stir.
>> Let cook for another 5 minutes. Turn off heat.
That’s it.
Your gorgeous chicken cacciatore is ready.
What can you do with this dish? Anything really. You are only limited by your imagination. If you are very carnivorous, you can eat it as a stew. But most people aren’t that carnivorous, so you will need to combine it with anything you so choose. Mixed veg, any veg, pasta, bulgur wheat, couscous, veggie salad, potatoes, brown rice, quinoa, beans etc, etc.
Your choice. It’s so tasty, the chicken cacciatore will go with anything you fancy. Enjoy!
Suggested reading:
The #1 Muscle That FIXES Ugly Forward Head Posture, Text Neck & Upper Back Pain
Save
Save

Food
 By Dr Joe
You probably realised how much I love my hummus. To have a meal that is so easy to prepare and be nourishing at the same time, you gotta ask the question: what’s not to like?
I will also add that if you really want to make hummus as often as I do, then you need to get one essential tool. Having the right tool makes life so much easier that preparing your next hummus will be a breeze.
What tool am I on about?
It’s the food processor. I know I have always said a blender will make a nice substitute for the food processor, if you don’t own one.
That may be true. But using a blender is a lot more fiddly and more involving when you want to make the hummus. Don’t forget hummus is a paste.
If the end product of what you are preparing is a thick paste, then a food processor is to be preferred to a blender.
You can get a decent food processor like this one here on Amazon.co.uk and here on Amazon.com
So here we are, we are going to be making the almond butter hummus. Almonds have moderately high polyunsaturated fatty acids, with a total of 12 grams per 100 grams, most of it in omega-6. Almonds are a fabulous source of riboflavin, magnesium, vitamin E, manganese and copper.
Time to employ it in our hummus recipe.
What do we need for this almond butter hummus recipe?
Ingredients:
Almond butter X 3 tbs
Chickpeas (drained) X 2 Cans
Garlic X 3 cloves
Lemon fruit X 2
Hot paprika powder X 2 tbs
Black pepper X 1 tbs and half
Cumin powder or seeds X 2 tbs
Salt


Almond butter nutritional information per tbs (16 g)
| Calories |
98 kcal |
| Total fat |
9 g |
| Saturated fat |
0.7 g |
| Monounsaturated fat |
5 g |
| Polyunsaturated fat |
2.2 g |
| Cholesterol |
0.0 g |
| Total Carbohydrate |
3 g |
| Sugar |
0.6 g |
| Fiber |
1.7 g |
| Protein |
3.5 g |
| Sodium |
1.1 mg |
| Potassium |
118 mg |

How to make the Almond butter hummus
>> Chop up your garlic, squeeze and de-seed your lemon fruits.
>> Pour the lemon juice into food processor or blender.
>> Add the cumin, garlic, hot paprika powder, black pepper and the almond butter and blend together for about 10 seconds.
>> Pause the food processor or blender. Scrape down the contents from the sides of the food processor into the base. The initial blending action will cause a splash inside the processor. Gently scraping the splashed content will return the blended ingredients back to the base of the food processor.
>> Now add the chickpeas and salt to taste.
>> Turn on the processor again to mash up all the content. You may pause it after 2 minutes and may be manually stir the content to ensure a homogenous hummus paste. Turn it off when you are happy with it.
That’s it. Your almond butter hummus is ready to be savoured.
Garnish with chopped chives and serve with a complementary food to go with it. Pita bread, Rye bread, Carrots, Tortilla chips, Lentil chips, Beetroot chips are examples of complementary foods that will go with the almond butter hummus.
I had mine with roasted parsnips. Gorgeous!
Testing the almond butter hummus and roasted parsnips 1 hour after eating, I had a blood glucose reading of 6.2 mmol/l (111.6 mg/dl). Pretty good.
Suggested further reading:
These Critical Foods prevent Chronic Diseases and Stop Inflammation whilst boosting Energy
Save
Save
Save
Save
Food
 By Dr Joe
I do not have a baking bone in my body but I’d like to find one regardless. How else will I be able to share some recipes that would involve a little bit of baking.
Don’t be fooled. I have no plans to get on the Great British Bake Off programme.
But I just want enough baking skills to do stuff that can put one or two baking products on the table and feed my hunger.
So, off I went on a journey of personal discovery in search of refined baking skills. And I’m glad I did.
As a forerunner, I now have the pleasure of presenting you with this first of many baking products to land on your mobile or laptop screens.
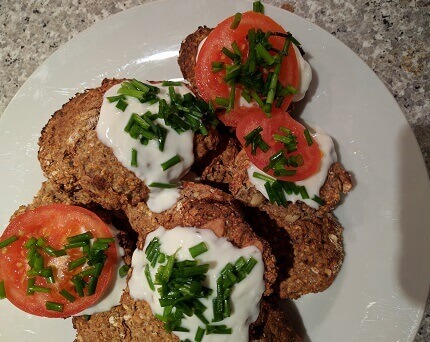
Now if I can do it, there is no reason why you can’t. Practically anyone with a small modicum of baking skills can produce these Banana Oatmeal Cookies.
These banana oatmeal cookies are divine to taste. Sweet but have enough fibre in them to prevent any blood sugar spike. Remember, I always talk about preventing blood glucose spikes. It’s your first step towards preventing weight gain or first step to losing weight.
I have even included in this banana oatmeal cookies recipe cinnamon to help keep blood glucose levels low, so despite the sweetness oozing subtly from the banana, you shouldn’t have any surprises regarding blood glucose spikes and that’s very important here.
Even the flour incorporated in this banana oatmeal cookies is derived from Rye. Rye features low on the glycaemic index scale which is what you want.
So, what do we need for the Banana Oatmeal Cookies recipe?
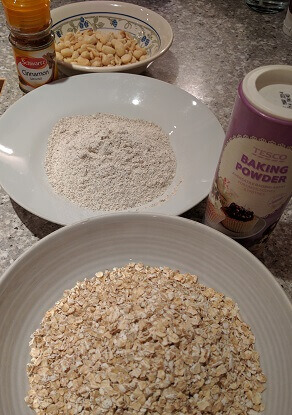
Ingredients:
Banana X 7
Rolled Oats X 2 cups and a quarter
Rye flour (wholemeal) X 1 cup and half
Cashew nuts X 90 g
Cinnamon X 4 tbs
Baking powder X 2 tbs and half
Vanilla extract X 2 tbs and half
Peanut butter X 3 Scoops
Honey X 2 tbs (optional)



How to make the banana oatmeal cookies
This recipe is compartmentalised in 2 preparation batches before bringing them together into one – the dry ingredients and the wet ingredients.
The dry ingredients:
>> Put the oatmeal into a mixing bowl and add the rye flour. Mix together.
>> Add the cinnamon, cashew nuts and the baking soda to the oatmeal and rye flour mixture. Stir together.
The wet ingredients:
>> Slice up the bananas into a 2nd mixing bowl for easy mashing up. Mash up the bananas into a fine mush. Add peanut butter, honey (very optional) and vanilla extract into the bowl and mix all together.
>> Now pour the dry ingredients into the bowl with the wet ingredients and mix together thoroughly to make the banana oatmeal cookie batter. The batter should be a very thick paste.
>> Line your baking tray with alluminium foil. Spray oil all over foil to prevent cookies from sticking to the alluminium foil during baking.
>> Now sccop in your batter in whatever shape and size you desire. Use a spatula or spoon to flatten them, if you like. You can make any shapes you like. It’s your chance to get crazy with shapes and sizes.
>> Bake for 15 minutes or less and take out of the oven. Always check on them to ensure the cookies aren’t getting too dry. The cookies will bake in less time if the oven is pre-heated, for instance.The texture of the banana oatmeal cookies needs to be just gooey on the inside when they come out of the oven. Crunchy on the outside, goey on the inside. Don’t worry the cookies will firm up as they cool off.
> Don’t expect them to be crunchingly hard though because the moisture in the banana makes that nigh impossible.
That’s it. Your banana oatmeal cookies are now ready. If you are in a hurry and can’t wait to devour them, you can eat them straightaway but they are better after cooling off. Store in an air tight container.
Take them to work to eat as your lunch with a nice cup of tea or coffee. Use the banana oatmeal cookies as snacks at home or at work. Take them for a picnic. Deploy them in any way you deem fit. They are yours to enjoy.
Suggested further reading:
The #1 WORST food for your skin, joints & blood sugar?
Save
Save
Save
Save
Save

Food
 By Dr Joe
When you have driven for 3 hours in the pouring rain and finally arrived home in one piece, thank goodness. You feel ravenous with an appetite so big you could ‘eat a horse’.
You reach for the refrigerator and there’s nothing there within reach that would satisfy your humongous appetite. What’s your natural reaction?
Reach for the phone and call your favourite take-away facility for a delivery that will take care of your appetite, right? No, we would do no such thing.
It doesn’t take a lot of work to cobble a meal together. Once I had a peek in my kitchen cupboard and I see something remotely resembling bulgur wheat, and a further peek into my refrigerator and green peas come into view, then I know I’m sorted.
With those two key ingredients, I know I could rustle up something together very quickly that is just as delicious as it is satisfying too.
Enter the Egg Fried Bulgur Wheat With GreenPeas – a grub in tune with your energy needs and much more.
What do we need for the egg fried bulgur wheat with green peas?
Ingredients:
Green Peas X 200 g
Bulgur wheat X 1 cup and half [Bulgur wheat on US Amazon.com]
Tomato X 1
Sweet Pepper (Bell Pepper) X 1
Red Onions X 1
Garlic X 2 cloves (crushed)
Eggs X 2
Vegetable stock powder X 1 tbs and half [Vegetable stock powder on US Amazon.com]
Rapeseed oil X 3 tbs [Rapeseed oil on US Amazon.com]
Turmeric
Cinnamon
Salt


Nutritional information on Bulgur Wheat per 100 g
| Calories |
320 kcal |
| Total fat |
1.3 g |
| Saturated fat |
0.2 g |
| Monounsaturated fat |
0.2 g |
| Polyunsaturated fat |
0.5 g |
| Cholesterol |
0.0 g |
| Total Carbohydrate |
76 g |
| Sugar |
0.4 g |
| Fibre |
18 g |
| Protein |
12 g |
| Sodium |
17 mg |
| Potassium |
409 mg |
Calcium, Magnesium, Vitamin B6 and Iron are all yours with Bulgur wheat.

How to make the egg fried bulgur wheat with green peas
>> Slice up your onions, garlic, tomato and sweet peppers (bell peppers). Break eggs, sprinkle some salt on the eggs and whisk them.
>> Pour twice the amount of water in relation to the amount of bulgur wheat into a cooking pot. So, I am talking about a ratio of 2:1.water to bulgur wheat. Heat up water and allow to boil. Add the vegetable stock powder to the boiling water and stir together to make a broth.
>> Pour the bulgur wheat into the boiling vegetable broth. Stir together and allow to cook for about 12 minutes checking every now and again, to ensure the broth does not dry up before the bulgur wheat is properly cooked. You may need to add some more water if the bulgur isn’t done yet.
>> When the bulgur wheat is nearly cooked and the water beginning to dry up, add the green peas and stir together. Allow to cook for about 2 minutes. Set bulgur wheat with green peas combo aside.
>> In a skillet or wok, pour in 3 tablespoons of rapeseed oil and turn on heat.
>> Add the onions and garlic. Stir together and let fry for about 1 minute.
>> Add the tomato and sweet pepper (bell pepper) and stir.
>> Add your seasoning agents – salt, turmeric and cinnamon and stir together. Allow to cook for another minute.
>> Add the eggs to the veggie fry up and stir for about a minute.
>> Now pour the previously cooked bulgur wheat and peas combo into skillet with the veggie stir-fry. Mix all the content of the skillet together by stirring. Let cook for another minute whilst stirring every now and again. Turn off heat.
That’s it. Your egg fried bulgur wheat with green peas is ready.
It’s time to feast your eyes and feast your mouth.
Did the egg fried bulgur wheat with green peas pass the blood glucose test? It sure did. I got a blood glucose reading of 6.3 mmol/l (113.4 mg/dl). That’s alright by me.
Further reading:
1 Unique Spice That BEATS Abdominal Fat (plus controls blood sugar)
Save
Save

Food
 By Dr Joe
So, I still have people who are in the dark about my standard hummus recipe that uses Tahini as one of the important ingredients that adds that little zest to your hummus.
They aren’t sure what Tahini is. I have explained that Tahini is just a paste of sesame seeds.
Sesame seeds provide a nice supply of Omega 3 fatty acids. These are great polyunsaturated fatty acids that bolster your health and are essential by the way.
But it’s also nice to have a good variety of fatty acids in your health portfolio. So, this time we will go for the Omega 6 fatty acids instead of the Omega 3.
So, for this hummus recipe, we are going to use peanut butter instead of sesame seed paste (Tahini). Are we going to get the same result in taste and enjoyability? Yes, we do actually.
I loved how this peanut butter hummus recipe turned out. It was good. Very good.
What do we need for the Peanut butter hummus recipe?
Ingredients:
Chickpeas (drained) X 2 Cans
Garlic X 3 cloves
Peanut butter X 3 tbs
Cumin X 2 tbs
Black pepper X 1 tbs and half
Hot Paprika powder X 2 tbs
Lemon fruit (Squeezed) X 1 and half
Salt

How to make the Peanut Butter Hummus
A food processor is best for making hummus but if you don’t have a food processor, don’t sweat it. You can use a regular blender instead. The only problem with using a blender is that it requires more work on your part as you have to keep pausing the blender to stir the content to get a consistent blend. But hey, it still works and you will get your hummus, won’t you?
>> Chop up the garlic and squeeze out the lemon to get your fresh lemon juice.
>> Pour the lemon juice into the food processor or blender.
>> Add the chopped garlic, peanut butter, cumin, black pepper, hot paprika powder and blend the mixture for about 30 seconds. Pause and scrape down the paste from the sides of the food processor or blender and restart the processor or blender for a fine mix. Pause after another 20 seconds.
>> Now add in the chickpeas and salt to taste.
>> Blend the content until you have a nice thick paste. For me I like my hummus thick but this may not be your bag. Add a little amout of water if you desire a thinner hummus but be careful, a hummus should never be runny, otherwise you ruin what should be a fantastic dining experience.
>> Pause the food processor or blender when you are satisfied you’ve got a good blend.
That’s it. Your peanut butter hummus is ready. Garnish with chopped chives. Awesome.
Time to feed your desire.
Serve with any of these – vegetables, pita bread, healthy cookies, rye bread etc. I have my peanut butter hummus with Carrots. OMG, the taste is divine!
What about blood sugar friendliness? Well, I had a blood glucose reading of 5.4 mmol/l (97.2 mg/dl). This was a 1 hour reading after having the peanut butter hummus with quite some carrots. I can live with that!
Suggested further reading:
The #1 WORST food for your skin, joints & blood sugar?
Save
Save
Save

Food
 By Dr Joe
It’s amazing where you get inspiration from when you are looking for culinary ideas for the evening.
I developed this Apple Infused Red Kidney Beans Stew idea reading a catalogue for wrist watches. Yes, you read right. Wrist watches. That gives you an indication as to how “exciting” my life is…LOL.
It’s the story of a Mr Showman who stepped off his high-performance lamborghini waving his $32,000 wrist watch at anyone who cares to look.
Not only that Mr Showman has an attitude problem, excused by his new found wealth. Is that justifiable? Probably not.
In that same scene steps out another fine gentleman. This 2nd gentleman (Mr Nice Guy) was the exact opposite of Mr Showman.
He was calmer, a charmer and was wearing an equally impressive-looking wrist watch. But the price of Mr Nice Guy’s watch was100 times less.
Mr Nice Guy rolled up his sleeve as if to compete with Mr Showman exposing his watch but pointing at Mr Showman’s wrist, uttering the compliment “Nice watch”.
Mr Showman nodded giving his approval probably not realising how much less My Nice Guy got his not-too-dissimilar watch for. He even thinks they belong to the same club when in actual fact their lifestyles couldn’t be further apart.
That personality contrast between Mr Showman and Mr Nice Guy got me thinking. You don’t have to go to an expensive restaurant to have a nice decent meal. A little imagination is all you need.
The Apple infused Red Kidney Beans Stew is tintillating to taste and satisfying at the same time. Step inside your house, your kitchen and get this meal ready in 30 minutes or less. It’s going to be 30 minutes well spent.
What do we need for this Apple Infused Red Kidney Beans Stew?
Ingredients:
Red Kidney Beans X 2 Cans
Chopped Tomatoes X 1 Can
Sweet Peppers (Bell Pepper) X 1
Red Onions X 1
Garlic X 2 Cloves
Parsley
Apple fruit X 1
Coriander
Black Pepper
Vegetable Stock X 1 tbs and half [Vegetable stock on Amazon.com]


Nutritional facts for red kidney beans per 100 g
| Calories |
117 kcal |
| Total fat |
0.6 g |
| Saturated fat |
0.1 g |
| Monounsaturated fat |
0.1 g |
| Polyunsaturated fat |
0.5 g |
| Total Carbohydrate |
17.8 g |
| Sugars |
3.6 g |
| Fiber |
6.2 g |
| Protein |
6.9 g |
| Cholesterol |
0.0 g |
| Sodium |
1 mg |
| Potassium |
405 mg |
Red kidney beans will also serve you Calcium, Vitamin C, Vitamin B6, Iron and Magnesium.

How to make the Apple Infused Red Kidney Beans Stew
>> Slice the onions, garlic, sweet pepper (Bell pepper), apple fruit and parsley herb into fine pieces.
>> Pour the 2 cans of Red Kidney Beans into a cooking pot undrained. We are going to use the water in the kidney beans as the fluid medium of cooking. Allow to boil for about 4 minutes.
>> Add the onions and garlic to the beans, then stir together and allow to cook for another 4 minutes. Then add the sweet pepper (bell pepper), stir together.
>> Pour in the chopped tomatoes into the beans, stir together. Allow to cook for another 4 minutes.
> Now season up the red kidney beans – add the vegetable stock powder, black pepper powder and coriander and stir together. Allow the seasoning agents to spice up the beans for another 4 minutes. If you taste the beans at this point, you will begin to see how this whole dinner is shaping up.
>> Add the chopped parsley herb and cook for 3 minutes.
>> Now infuse the red kidney beans with the chopped apple fruit. Stir the apple pieces with the beans and allow to cook for a further 3 minutes, stirring intermittently. Turn off heat.
That’s it. Your apple infused red kidney beans stew is ready.
Enjoy this stew. You are going to love it.
Testing 1 hour post meal gave me a blood sugar reading of 5.3 mmol/l (95.4 mg/dl). I had mine served with a nice glass of lemon-infused ice-cold water. Lovely!
Suggested further reading:
The Salad Dressing to NEVER Eat
Save
Save
Save
Save
Save



Dr. Joe