
Food
 By Dr Joe
A healthy strawberry blueberry banana smoothie recipe is not just here but it’s yours for the taking, folks. I haven’t published new smoothies for a while.
Not because I haven’t been sipping on any smoothies for this length of time.
The main reason being that I have been busy crafting some other vegetable recipes together and those recipes have somehow taken priority.
Your health is important to me and I have to spread the net far and wide to ensure whenever you stop by, you get something new to chew on and more importantly your health gets the overall benefits.
As you know I love the berry fruits, not just because they are colourful and pretty but that the colour you see gives the berries a nutritional meaning.
The colour is what gives berries that unique ability for preventing chronic inflammation in your body.
Polyphenols, folks, polyphenols. Just remember that. If you do, you will want to have more berries in your diet. Use any excuse to get some berries on board.
This healthy strawberry blueberry banana smoothie is sure going to float your boat. In this healthy stawberry blueberry banana smoothie, you will be close to meeting the recommended 5 portions of fruits and vegetables a day to keep the doctors idle. This is a healthy strawberry smoothie recipe that you can employ for weight loss too.
What do we need to make the healthy strawberry blueberry banana smoothie?
Ingredients:
Strawberries X 200 g
Bluberries X 150 g
Banana X 2
Protein powder X 2 scoops
Flaxseeds (Linseeds) X 4 tbs
Natural Yogurt (low fat) X 250 g
Plant-based milk X 120 ml

How to make the healthy strawberry blueberry banana smoothie
You need a Nutribullet smoothie maker to do this effieciently but if you don’t, a regular blender will suffice. You can grab a discounted Nutribullet here however.
>> Chuck in your banana into the Nutribullet jar, slicing the bananas up for ease.
>> Add the blueberries and strawberries.
>> Scoop in your proten powder and add the flaxseeds (linseeds).
>> Blitz the content for about 30 seconds. Pause the nutribullet.
>> You will find the content to be very thick.
>> Now add the yogurt and the milk and blitz again for another 30 seconds. Pause the nutribullet.
Boom. Your healthy strawberry blueberry banana smoothie is ready.
Enjoy!
I say this smoothie is healthy and I say that with confidence because 1 hour post-drinking this healthy strawberry blueberry banana smoothi, I got a blood glucose reading of 4.6 mmol/l (82.8 mg/dl). Now that’s healthy.
Suggested further reading:
These Critical Foods prevent Chronic Diseases and Stop Inflammation whilst boosting Energy
Save
Save
Save
Save

Food
 Dr Joe
It’s slap bang in the middle of spring and you expect the weather to be a little friendlier and it just isn’t. You look outside and it looks grey and the temperature?
Well, let’s just say it isn’t springy at all. In fact, the heating has got to be turned on again, so you don’t freeze yourself out.
How can you rescue a miserable looking day like this as the evening is nigh upon us.
Let’s have a meal that is hearty enough but has great elements of health upon it at the same time. A meal like that is bound to warm the cockles up.
After all, you’ve just turned on the heater, why not turn on the cooking hob as well and get the show on the road.
What are we making to brighten up the evening?
We are making linguine with smoked mackerel and broccoli. Fancy that?
What do we need to make the linguine with smoked mackerel and broccoli?
Ingredients:
Linguine X 100 g
Smoked Mackerel X 3 fillets
Broccoli X 1
Red Onions X 1
Garlic X 2 cloves
Rapeseed oil X 3 tbs
Red Wine
Olives X 80 g
Coriander herbs
Red WIne Vinegar
Cashew nuts X 80 g
Black pepper (optional) X 1 tbs and half


How to make the Linguine with Smoked Mackerel and Broccoli
>> Slice up your red onions and garlic. Break the smoked mackerel into smaller pieces.
>> De-floret your broccoli and cut to smaller pieces.
>> Boil water and cook your linguine the usual way until it is less tough to chew. I like mine pretty soft. Cook linguine to the texture that you like. I like to add a little salt to my linguine. You can taste the linguine every now and again to check for the texture that you like. Once it is done, turn off heat and set aside.
>> Now add the rapeseed oil to a sauce pan or skillet/wok. You may use another cooking oil that floats your boat instead of rapeseed oil.
>> Heat up oil and add the sliced red onions and garlic. Stir intermittently until onion is beginning to soften.
>> Add the broccoli and stir for about 1 minute.
>> Add the pieces of smoked mackerel and stir together for about 15 seconds.
>> Add the red wine. It will sizzle and that’s good. How much red wine should you add? Not a lot – about 30 – 50 ml. You don’t need to flood the cooking mixture but enough to juice it up and impart the wine flavour.
>> Stir together intermittently. Add the cashew nuts and coriander herbs (and black pepper if you are using it to give it a kick). Stir together.
>> Now add the cooked linguine to the veggie mixture and stir together for another minute. Turn off heat.
That’s it. Your Linguine with Smoked Mackerel and Broccoli is ready.
Garnish with some more Cashew nuts and Coriander herbs and enjoy!
Bonus tip: Top the linguine with smoked mackerel and broccoli with a generous splash of red wine vinegar and amplify the taste of this dish. You will love it even more.
What about blood sugar fitness for the linguine with smoked mackerel and broccoli. I got a blood glucose reading of 6.9 mmol/l (124 mg/dl). Not bad!
Suggested further reading:
Broccoli and your Abdominal Fat (Odd fat fighters)
Save
Save
Save
Save

Food
 By Dr Joe
Continuing my theme of loving the rocket (arugula) vegetable, I thought I come up with a recipe that has immense benefits for your bowel.
Gut health is a big thing these days. In fact, it is theorised that a lot of inflammatory conditions affecting human kind today are traceable to problems with the gut.
Fix this and you will be on your way to a well person.
Not to be left out, I thought: How about having simple salad recipe that has probiotic in it. I have a feeling this is a first but that is arguable in the grand scheme of things.
I will confess, I have not looked to see if anyone else has done this before. It’s just something that I came up with in my head that looks really, really healthy to me and I thought I’d run with it.
So, what’s this salad then?
I call it the probiotic nutty rocket salad.
In this probiotic nutty rocket (arugula) salad, you have vegetables (tick), fruit (tick), nuts (tick) and a probiotic (tick).
The probiotic is natural yogurt and you guessed it, the yogurt is going to be the “salad cream”. Now, don’t knock it until you’ve tried it, okay.
Besides, if it looks unusual to you on the plate, just remind yourself that it shares the same ‘good looks’ with a bowl of coleslaw. If you have ever liked coleslaw in your life, why not this pleasant and rather healthy probiotic nutty rocket (arugula) salad. Kinda of the same, only difference is coleslaw uses Mayonaise but instead we are using the really healthy option here – Natural Yogurt.
So, what do we need for this probiotic nutty rocket (arugula) salad?
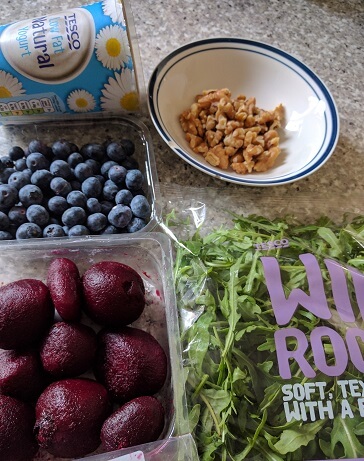
Ingredients:
Rocket (arugula) vegetable X 70 g
Blueberries X 150 g
Walnuts X 70 g
Beetroot X 4
Natural yogurt (low fat) X 250 g

How To Make The Probiotic Nutty Rocket (arugula) Salad
>> Wash your rocket (arugula) vegetable and toss into your salad bowl.
>> Chop your beetroots up into small bitesizes and add to the salad bowl.
>> Add your blueberries and walnuts.
>> Now that’s looks pretty, right.
>> Let’s “enhance” the salad look by scooping in our natural yogurt (low fat) and stir together. See, I told you it will look like coleslaw but only chunkier.
That’s it. Your probiotic nutty rocket salad is ready.
Now enjoy this awesome salad. This is one of the healthiest salads you will ever eat. You can try this the next day with Spinach vegetables instead of Rocket and you will still be on track to treating your bowels to great health whilst your coronaries and other blood vessels will be dancing for joy.
Enjoy!
What about blood sugar test for this probiotic nutty rocket salad. I got a blood glucose reading of 5.3 mmol/l (95.4 mg/dl). Awesome!
Suggested further reading:
The Salad Dressing to NEVER Eat
Save
Save
Save
Save
Save

Food
 By Dr Joe
As some of you probably know, I am preparing for a walking challenge. Actually 2. A 30-mile one and a 60-mile added for good measure. Heaven help me.
So after coming back from a 10-mile practice “run”, I needed something to replace the energy burnt on the walk.
For the record, I ain’t doing the walk to lose weight. I have lost as much weight as I want to. Don’t need to lose any more. It’s more for maintaining my cardiovascular fitness.
Got back and was wondering what to have for this evening’s dinner. As luck would have it, I had crafted a recipe in my head during the 10-mile walk.
One beauty of walking as opposed to jogging is that, you have ample opportunity to think and come up with ideas.
Walking gets your creative juices flowing. Try doing that when you are jogging. Fat chance!
Having come up with the recipe, it became a case of whether I had all the necessary ingredients in the house without me going to the shops that evening. Luckily, I had. That recipe is the bulgur wheat with broccoli veggie mix.
I would encourage you to try this recipe because it is gorgeous.
What do we need for the Bulgur Wheat with Broccoli veggie mix?
Ingredients:
Bulgur wheat X 1 cup
Broccoli
Red Onions X 1
Sweet peppers (Bell peppers) X 1
Garlic X 2 cloves
Rapeseed oil
Vegetable broth powder X 2 tbs
Cinnamon X 2 tbs
Black pepper X 1 tbs


How To Make The Bulgur Wheat with Broccoli Veggie Mix
>> Slice up your broccoli florets into smaller chunks
>> Slice up your red onions, garlic and sweet pepper (bell pepper).
>> Pour bulgur wheat into a cooking pot and add water to the bulgur wheat on a ratio of 2:1 (Water to bulgur wheat).
>> Add 1 tablespoonful of the vegetable stock powder to the bulgur wheat and stir together.
>> Cook bulgur wheat for about 8 minutes. You may need to add extra water if the bulgur wheat dries up too quickly but only a little water at a time.
>> Once bulgur wheat is done, set aside.
>> Add 2 tbs of rapeseed oil into another pot or skillet (Wok).
>> Heat up oil and add the red onions and garlic. Stir together until onions are tender. Lower the heat – very important.
>> Add the broccoli and stir fry until the broccoli florets turn bright green. Then add the sweet peppers (bell pepper) and stir fry for a minute.
>> Add the seasoning agents – cinnamon, black pepper and the 2nd tablespoonful of the vegetable broth powder and stir together.
>> Now add the cooked bulgur wheat into the broccoli veggie mix and stir together thoroughly.
>> Allow to cook for 1 minute and half stirring intermittently.
Turn off heat. That’s it.
Your bulgur wheat with broccoli veggie mix is ready.
Serve the bulgur wheat with broccoli veggie mix in your fave dinner plate. You may garnish with Macademia nuts (optional) to add extra crunch.
Does the bulgur wheat with broccoli veggie mix pass my blood sugar test? It sure does. I got a blood glucose reading of 6.2 mmol/l (111 mg/dl).
Suggested further reading:
3 Unique Veggies That Fight Abdominal Fat?
Save
Save
Save
Save
Save
Save

Food
 By Dr Joe
How do you make someone who hates a particular food fall in love with it? That was my challenge 2 nights ago.
My daughter hates parsnips for no discernible reason. So I felt I will take up the challenge of making her fall in love with parsnips again. Why would anyone dislike parsnips is beyond me.
Parsnips are a fantastic source of fibre which translates to overall improvement of your bowel health and there is even some evidence that parsnips may be good for your heart health.
In an attempt to overturn my daughter’s hatred for parsnips, I came up with this parsnip tuna bake with a coconut flavour to boot. This was a challenge I really wanted to win and I did.
What do we need for the Parsnip Tuna Bake recipe?
Ingredients:
Parsnips X 6
Coconut milk (canned) X 400 ml
Tuna (canned) X 1
Sage X 1 tbs and half
Black pepper X 1 tbs
Hot paprika X 1 tbs
Tumeric X 1 tbs
Yeast flakes X 2 tbs
Vegetable stock powder X 2 tbs
Salt to taste


Parsnips nutritional information per 100 g
| Calories |
75 kcal |
| Total fat |
0.3 g |
| Saturated fat |
0.1 g |
| Polyunsaturated fat |
0.0.g |
| Monounsaturated fat |
0.1 g |
| Total Carbohydrate |
18 g |
| Sugar |
4.8 g |
| Fibre |
4.9 g |
| Protein |
1.2 g |
| Cholesterol |
0.0 g |
| Sodium |
10 mg |
| Potassium |
375 mg |
Parsnips also supply you with Calcium, Manganese, Vitamin B6, Vitamin C & Iron.

How to make the Parsnip Tuna Bake
>> Peel parsnips and slice them up into smaller chunks.
>> Put parsnip pieces into a baking tray.
>> Pour coconut milk into a separate bowl. You may need to warm the coconut milk in a microwave for 2 minutes, if when you open the coconut milk can, it has become solidified. That’s the usual behaviour of coconut milk – it hardens at room temperature. So, don’t be alarmed, it hasn’t gone off.
>> Add the sage, black pepper, turmeric, hot paprika, tuna (drained of oil), yeast flakes, vegetable stock powder and a little salt – all of the seasoning ingredients to the warmed coconut milk. Stir together to make a nice coconut milk sauce.
>> Now pour in the coconut milk sauce into the baking tray with the parsnips chunks and mix the parsnips chunks with the coconut sauce. Ensure the parsnips are spread uniformly in the baking tray.
>> Place tray containing the parsnips and coconut milk sauce in the oven and allow to bake for about 25 minutes. Should be less if oven is pre-heated.
>> Parsnips are done when they are beginning to turn golden brown.
That’s it.
Your parsnip tuna bake is ready for munching.
Serve in your favourite dinner plate and garnish with coriander herbs.
Did I pass the challenge of making my daughter love pasrsnips again. Yes, I did. My daughter loved every bit of it. Hear her: “I used to find the taste of parsnips boring, Dad, but you have completely transformed my opinion with the way you seasoned this parsnip dish. I love it”
Does the parsnip tuna bake stand up to my blood sugar test? Yes, it does. I got a blood sugar reading of 6.0 mmol/l (108 mg/dl).
Suggested further reading:
The #1 WORST food for your skin, joints & blood sugar?
Save
Save
Save
Save

Food
 By Dr Joe
I was looking for some creative ideas when I wandered into my kitchen this evening. You have a bundle of ingredients that have provided you with a beautiful delight previously.
But you figured you want something different other than that beautiful delight with the exact same ingredients.
Wierd, I know. Why would someone not re-visit a recipe with a beautiful outcome?
That’s difficult to explain, but creativity is what makes food exciting. Food preparation should not be a boring exercise.
I describe my kitchen as a laboratory. I love crafting recipes right in there after working it out in my head what I would like to create.
Sometimes it works, sometimes it doesn’t but that’s what makes the whole process exciting.
So I thought, how about I use the same ingredients that I used to make the plummed peanut butter hummus and make a different dish altogether.
And why not. To cut a long story short…That is how the peanut buttered chickpeas with carrots recipe was born.
What do we need to make the Peanut buttered chickpeas with carrots?
Ingredients:
Canned Chickpeas (drained) X 3 cans
Carrots X 4
Red Onion X 1
Peanut butter (Crunchy) X 3 tbs
Plums X 3
Cumin X 3 tbs
Paprika hot X 3 tbs
Black pepper X 2 tbs
Rapeseed oil X 3 tbs
Salt


How to make the peanut buttered chickpeas with carrots
>> Slice up your red onions, carrots and plums into small pieces. It is important the size of the carrot pieces are comfortable chewing sizes, because that is part of the excitement of this meal when you are munching it.
>> Add the rapeseed oil (or whatever cooking oil you prefer) into your skillet or wok. Turn on heat.
>> Add the red onions to the oil once it has heated up. Stir and allow the onions to become tender.
>> Pour in the drained chickpeas and stir together thoroughly. Allow to cook for about 4 minutes whilst stirring intermittently.
>> Add the carrots and stir together. Allow to cook whist stirring intermittently for about 2 minutes.
>> Add all the seasoning agents – the cumin, black pepper, hot paprika and salt and stir together thoroughly for about 1 minute. It is important to add enough salt, otherwise you will have that “there’s something missing” feeling when eating this meal. Add and taste each time to see if you have “arrived”.
>> Add the crunchy peanut butter and stir together to allow the peanut butter to uniformly coat the contents of the pot.
>> Now add the sliced plums and stir together for about 1 minute and half and turn off heat.
That’s it, your peanut buttered chickpeas with carrots is ready to be served.
Enjoy the warmth and tenderness of the chickpeas and the crunchiness of the carrots that gives you an exciting feeling as though you are crunching on peanut pieces rather than carrot pieces. It’s lovely!
Blood sugar friendliness of the peanut buttered chickpeas with carrots? I got a reading of 6.6 mmol/l (118.8 mg/dl) 1 hour post-meal. Not bad at all!
Suggested further reading:
3 Unique Veggies That Fight Abdominal Fat?
Save
Save
Save
Save
Save


Dr. Joe